Homemade Enchilada Sauce

When you grow up knowing certain foods from a can or a box, it becomes hard to imagine how easy they might be to make homemade. I’m always surprised when I talk to people who say they made banana bread or blueberry muffins using a box mix, but maybe that’s because, to me, those foods are simple things that my family always made from scratch. Measuring the flour, baking powder, sugar and salt that it took for homemade muffins seemed just as easy as opening a box, (okay, opening a box is pretty easy) and in my mind it tasted much better.

IMG_1632

Of course my parents didn’t cook everything from scratch. We had our Sunday Kraft macaroni and cheese tradition, Cincinnati chili and tacos made from a packet mix, and chicken enchiladas with canned enchilada sauce. Having grown up with these foods, I never questioned their authenticity or feasibility as a homemade food. As my culinary skills and recipe collection broadened, I began to learn that many purchased foods I’d had growing up could easily be homemade.

IMG_1627

The start of enchilada sauce bubbling away: oil, flour, chili powder.

Before we packed up our whole life to move to Seattle, I made us a batch of freezer meals to get us through the days without our skillets, spatulas, pots, and plates. In addition to Meatballs and Baked Chicken Nuggets, I made a batch of Chicken and Bean Enchiladas with a homemade enchilada sauce. This sauce starts like many sauces with a roux, which simply means fat and flour. These two ingredients will be your sauce thickener and as long as they are whisked in gradually and lovingly you will end up with a rich and smooth sauce. Once you get the hang of it, it’s really quite easy. Not as easy as opening a can and pouring it in, but come on now – have a little fun!

IMG_1731

Bagged up, ready for the freezer!

IMG_1729

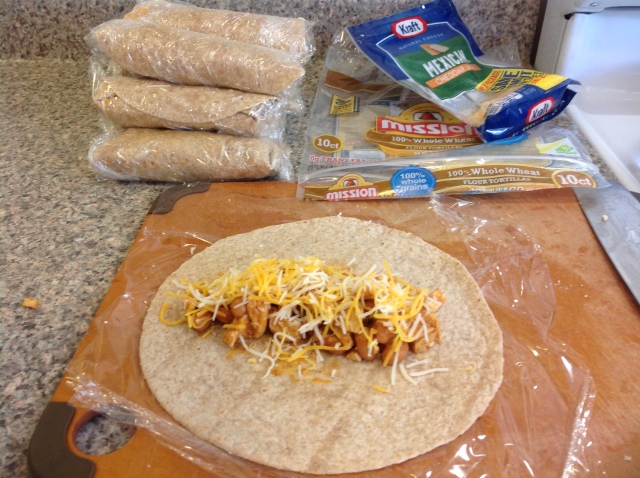
Fill up your tortillas with chicken, cheese, and beans and roll ’em up!

IMG_1629

After adding the tomato paste…

Now listen: everyone has different culinary skills and ambitions. You might be just fine with your canned sauce or even your Mexican take-out place, and someone else might insist that everything be homemade with the purest ingredients. Sometimes you just don’t have time to whip up something from scratch and I totally understand. Nonetheless, I find it valuable to at least know, for all those canned and packaged foods you buy, how you could make it yourself. My rule is if you’ve made it at least once before or you know the process of making it, you are allowed to “cheat” every now and then and just buy the pre-made version. I know I’ve done it before. So go ahead now – try making your own enchilada sauce just this once and then you can go back to your canned stuff. Maybe you’ll like it. Maybe you won’t.

IMG_1631

Homemade Enchilada Sauce

adapted from TheFresh20

1/4 cup no salt added tomato paste

1 tsp. ground cumin

1 tsp. dried oregano

1 garlic clove, minced or 1/2 tsp. granulated garlic

1/2 tsp. Kosher salt

1/4 tsp. black pepper

3 T. olive or canola oil

1/4 cup whole wheat or all-purpose flour

1-2 T. mild chili powder (depending on spice level desired)

3 1/2 cups – 5 cups chicken broth, warmed*

*Whenever I make chicken enchiladas I start by simmering the chicken in chicken broth. For 3-4 chicken breasts I use 6-8 cups of water with Chicken Better than Bouillon added according to the directions. I bring that to a light boil and immediately reduce to a simmer to cook for 10-15 minutes or until all the breasts are cooked through. I remove the chicken breasts to cool and use the warmed broth to make my sauce. You can also buy canned broth or make your own using a fresh whole chicken with vegetables and seasonings. Make sure the broth is warm when you add it into your sauce as it will be easier to incorporate.

For the sauce: In a small bowl mix tomato paste, cumin, oregano, garlic, salt, and pepper. Stir to combine and set aside.

Heat a large non-stick saute pan over medium heat. Add in oil, flour, and chili powder. Stir to combine until it becomes a thick paste. Add in tomato paste mixture and stir to combine.

Slowly add in hot broth while whisking to dissolve the flour mixture. Make sure to use a non-scratching whisk if you are using a non-stick pan. Continuing whisking while adding broth to your desired thickness. You can always add more if it’s too thick when it finishes.

Reduce heat to a simmer and cook for 5-10 minutes to deepen the flavor. Taste and adjust seasonings as needed – add more broth if it is too spicy or more salt and chili powder if it is too bland.

Use to mix with your cooked chicken and to top your filled tortillas in the pan before baking.

Enchilada, minus the enchilada sauce (just a burrito?)

Enchilada, minus the enchilada sauce (just a burrito?)

Post 46 – Mexican Chocolate Flan Cake

This cake.

IMG_3444

It’s the ultimate in cake transformation. Two separate, totally different parts of a cake switch places – seamlessly flip-flop. What am I talking about?

This delicious Choco-flan cake. Have you heard of it?

They say it’s impossible, (who are they anyway?) but somehow it happens every time. You make a thick chocolate cake batter and pour it into the bottom of a bundt pan (which would be the top when you flip it over right? Stay with me here)

IMG_3433

Evidence that I put the chocolate cake part in first!

and pour a soupy layer of eggs and milk on top of it (which should be the bottom of the cake when it’s served)

IMG_3438

IMG_3440

and miraculously when you pull it out of the oven, the chocolate cake is on the top and the custard layer has all but disappeared… until you flip it over (carefully!) and see the beautiful jiggly caramely thing it has become. I’d say there’s probably some serious cake science going on here, but you can just call it magic if you like.

See! How did that happen?

See! How did that happen?

I had a great excuse to make this cake again yesterday: a co-worker’s birthday. She’s a beautiful well-dressed older woman from Columbia, South America, who speaks rapid-fire Spanish. I once spoke a few words to her in Spanish and since then she has spoken to me at her usual pace as if I understood every word. It’s not because she’s cruel, but I think because she assumes I understand a lot more than I do. I don’t, but I appreciate the gesture. Nonetheless her actions and kind smile often speak for her, sweet woman that she is. Her smile told me today how much she enjoyed the cake.

Since I know nothing about Columbian desserts I thought I’d make this cake (which is actually a Mexican recipe) since it was something different from the usual layer cake and I thought maybe she’d appreciate it. The top custard layer bakes into a beautiful egg-y flan and as the cake sits, the once fluffy chocolate cake sinks lower and lower to become a dense chocolate torte. The two layers provide wonderful contrasting textures to each other – almost like cake with ice cream already part of it.

Anyway, the point is – this cake – you probably can find an excuse to make it. And it’s not impossible in the sense that you can’t make it. There’s just a little cake magic involved. But don’t worry – the cake does all the work.

Chocoflan

recipe from Scarletta Bakes

For the cake:
10 tbsp. unsalted butter, softened
1 c. white sugar, granulated
1 large egg, room temperature
1 3/4 c. all-purpose flour
3/4 tsp. baking powder
3/4 tsp. baking soda
1/3 c. cocoa powder, unsweetened
1 1/4 c. buttermilk, room temperature
1/4 c. cajeta or good quality caramel sauce to coat pan (Cajeta is a sweetened goat milk caramel that can be hard to find, but is totally worth it if you do. Or you can make it if you’re super ambitious.)

For the flan:
1- 12 ounce can evaporated milk
1- 14 ounce can sweetened condensed milk
4 ounces cream cheese, room temperature
3 large eggs, room temperature
1 tbsp. vanilla extract

For garnish:
1/4 c. cajeta or caramel sauce
1/4 c. chopped pecans (Note that I did not garnish my chocoflan at all.)

Butter or spray a 12-cup capacity Bundt pan and line the bottom with the cajeta. Place the prepared pan into a large roasting pan and set aside.

Position a rack in the middle of the oven and preheat to 350°.

To prepare the cake, add the butter and sugar to a bowl and, using an electric hand mixer or stand mixer, beat until light and fluffy, then beat in the egg. Sift together the flour, baking powder, baking soda and cocoa in a medium bowl. Beat 1/3 of the flour mixture, and 1/2 of the buttermilk into the egg mixture. Repeat, ending with the flour mixture. Blend until well incorporated.

IMG_3425

IMG_3427

Some stuff happens in between these two pictures that I didn’t document. Sorry…

IMG_3433

To prepare the flan, beat the room temperature cream cheese with the sweetened condensed milk until smooth. Slowly add the eggs, beating to incorporate with the cream cheese. Add the evaporated milk and beat. Alternatively blend in a blender. *

Scoop the cake batter into the prepared Bundt pan and spread evenly. Slowly pour the flan mixture over the cake batter. Cover with foil and put into the oven, leaving the door open briefly. Slowly add about 1-inch of hot water to the roasting pan (don’t splash the cake), slide the pan into the oven and close the oven door.

Or add the water before you put it in the oven, though it's a little more precarious.

Or add the water before you put it in the oven, though it’s a little more precarious.

Bake for 50 minutes to an hour out until the surface of the cake is firm or a toothpick comes out clean. When the cake is done, remove it from the water bath and allow it to cool completely to room temperature, about 1 hour.

Use a thin spatula and carefully go around the edges of the cake and a few inches down (if necessary) to help loosen the edges. Invert a large, rimmed serving platter over the Bundt pan, grasp tightly together and flip over. It is important to do this part with confidence and in one foul swoop or you may lose some of your cake. Remove the pan and scrape any remaining cajeta from the pan onto the cake, garnish with chopped pecans and serve (this cake is traditionally served after being chilled for 24 hours, but you can also serve it warm or at room temperature).

*I found that the cream cheese separated into chunks (the eggs were too cold maybe?) and ended up sitting at the bottom of the chocolate cake. It tasted fine overall, but I think incorporating the cheese with the liquid ingredients more slowly will help.

Towel courtesy of my good friend, Natalie!

Towel courtesy of my good friend, Natalie!


And for those of your drooling over the last post’s zucchini squares, here is the recipe:

Zucchini Squares

Adapted from Stillman’s farm CSA newsletter

1 cup Bisquick baking mix**

¼ tsp. salt

¼ tsp. pepper

dried basil and oregano (optional)

3-4 cups shredded zucchini (I used 3 cups because that’s what the zucchini yielded)

3 scallions, finely chopped

¾ cup grated cheddar cheese

4 eggs, beaten

¼ cup shredded parmesan (or more cheddar)

In a medium bowl mix Bisquick (or see substitute below) with salt, pepper, and dried spices as desired. Add in shredded zucchini, scallions, and shredded cheddar and stir to thoroughly mix. In a separate small bowl beat eggs so the yolks and whites are well mixed. Stir into the flour mixture.

Pour into a greased 8×8 baking dish and spread out. Sprinkle with parmesan cheese and bake at 350 for 35-40 minutes or until golden brown and springy when touched in the center.

**If you don’t use Bisquick, substitute (as I did) the following: 1 cup all purpose flour, 1 ½ tsp. baking powder, ¼ tsp. salt. Rub in 1 T. shortening or butter until it looks well incorporated.